Troubleshooting ‘Escape From Tarkov’s Server Disconnection Problems

Troubleshooting ‘Anticheat Failure’ Errors in Escape From Tarkov - Solved
Many players have been experiencing lost connection due to anticheat and anticheat loading failed errors on startup. To save your time searching for a real fix in forums, we’ve put together all the possible fixes when you get an error message ‘Anticheat connection failed’ in Escape from Tarkov.
Try these fixes
‘Anticheat connection failed’? Below you will find all the workarounds that have helped many other gamers. You don’t have to try them all; just walk your way down until you find the one that works for you.
- Run your game as an administrator
- Disable unnecessary applications
- Verify your game files
- Update your launcher manually
- Reinstall Battle Eye
- Update all your device drivers
- Reboot your router/modem
- Use a VPN
Fix 1. Run your game as an administrator
Many players will run your game executable file as admin permanently to fix some annoying issues. Lack of permissions can cause the ‘Anticheat connection failed’ error in Escape from Tarkov players. Here’s how to do it:
- Go to the folder where you installed the game.
The default installation folder: C:/Battlestate Games/EFT (live)
Right-clickEscapeFromTarkov application and selectProperties .
Go to theCompatibility tab, and check the boxRun this program as an administrator is checked.
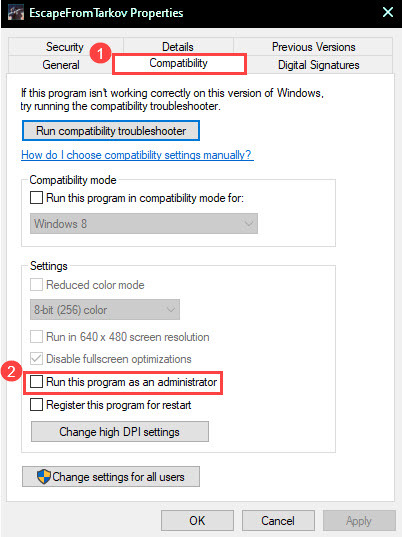
ClickOK .
Now try launching your game again to check if the error message is gone now.
If you’re already running this game as an administrator, you can uncheck the option instead. Many other players find
Fix 2. Disable unnecessary applications
Another basic troubleshooting is to make sure there’s no interference from other apps, especially from your antivirus software and apps with overlay features such as Discord. Here’s how:
PressCtrl + Shift + Esc to open Task Manager, and end all the unrelated processes.
Some antivirus software will continue working after being disabled. You can add your game to its exception list or temporarily uninstall it.
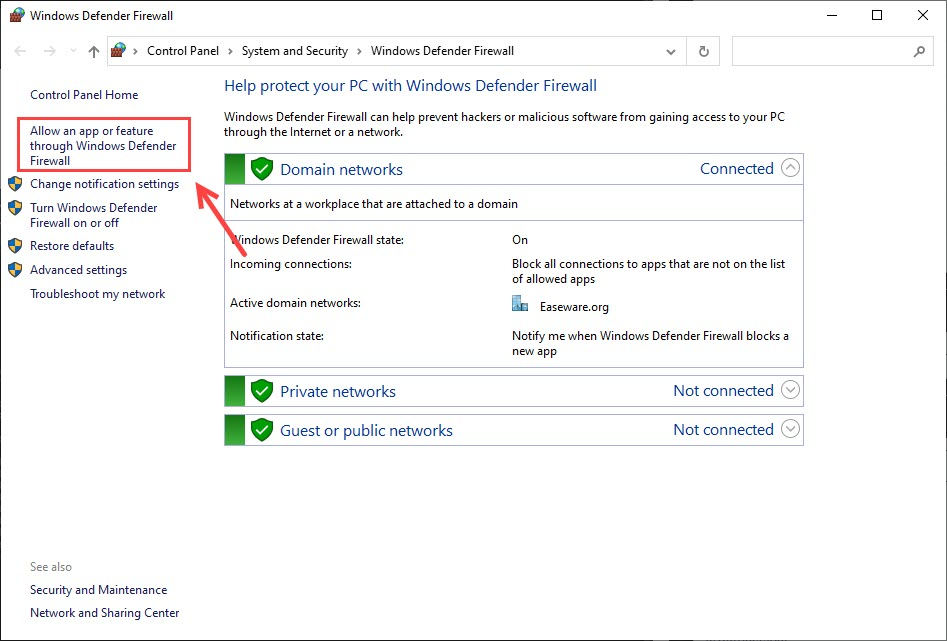
Allow Escape from Tarkov to run through the Windows Defender Firewall.
- Press theWindows logo key +R to open the Run box.
- Enterfirewall.cpl in the box.

- ClickAllow an app or feature through Windows Defender Firewall on the left pane.

- Make sure thePrivate andPublic boxes are both checked for Escape from Tarkov and the anti-cheat service BattlEye. If they’re not on the list, clickChange settings and add them here.
If you want to close all other programs not related to Windows, you may need to perform a clean boot. Followthis guide for instructions.
- Now you can try launching your game again to test the issue.
Fix 3. Verify your game files
This is a workaround you need to try in case that your game files get corrupted, which may lead to this error message ‘Anticheat connection failed’. To verify the files, here’s how:
Open the game launcher.
Under your profile name, click the down arrow key and then selectIntegrity check .
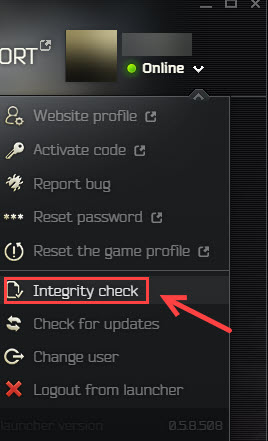
- Once complete, launch your game again to check if the problem has been fixed.
Fix 4. Update your launcher manually
Make sure your launcher has been updated to the latest version. You can check for updates in the launcher. But if the update failed, you can manually download the launcher, you can visit yourprofile page (you’ll need to log in first), and hit theInstall button.
Fix 5. Reinstall Battle Eye
Before you try reinstalling the whole game, you may want to check if Battle Eye is causing the ‘Anticheat connection failed’ error:
Quit your game and the launcher.
Go to the folder where you installed the game, delete theBattleEye folder andEscape from Tarkov_BE .

- Open the Battlestate Games Launcher, and perform anIntegrity check .

Wait for it to download these files again.
Once complete, go back to the game installation folder again. Open theBattleEye folder, and double-click theInstall_BattleEye.bat .
Now launch your game and check if the issue has been resolved.
Fix 6. Update all your device drivers
When it’s quite hard to troubleshoot the exact cause, we would recommend keeping all your device drivers up to date, including your graphics drivers and network adapter drivers. This would also keep your game from bumping into possible crashes in the future.
There are mainly two methods for you to update the device drivers (here we take graphics driver for an example):
Manually – To update your graphics driver to the latest version, you’ll need to visit the manufacturer’s website, download the exact driver, and then install it manually.
Automatically – If you don’t have the time, patience or computer skills to update your drivers manually, you can, instead, do it automatically with Driver Easy . Driver Easy will automatically recognize your system and find the correct drivers for your network adapter, and your Windows version, and it will download and install them correctly:
Download and install Driver Easy.
Run Driver Easy and click the Scan Now button. Driver Easy will then scan your computer and detect any problem drivers.
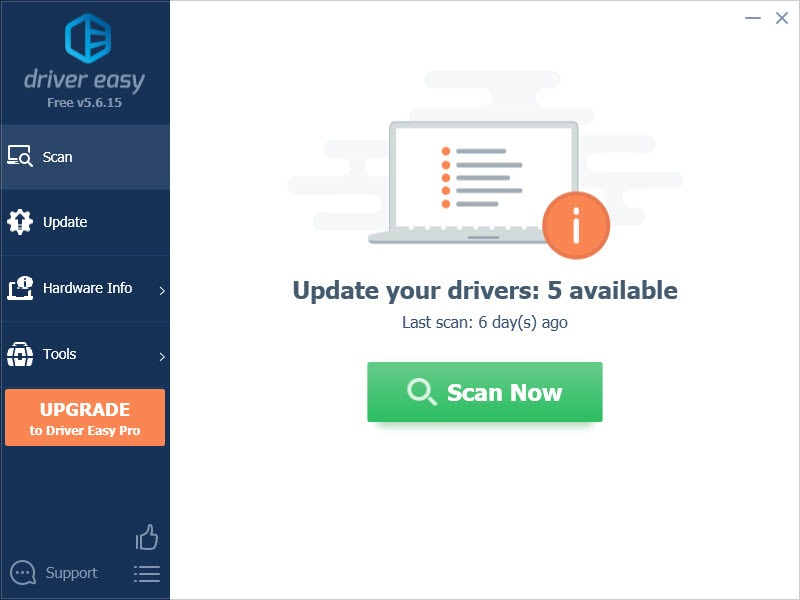
- Click the Update button next to the flagged network adapter driver to automatically download the correct version of that driver, then you can manually install it (you can do this with the FREE version).
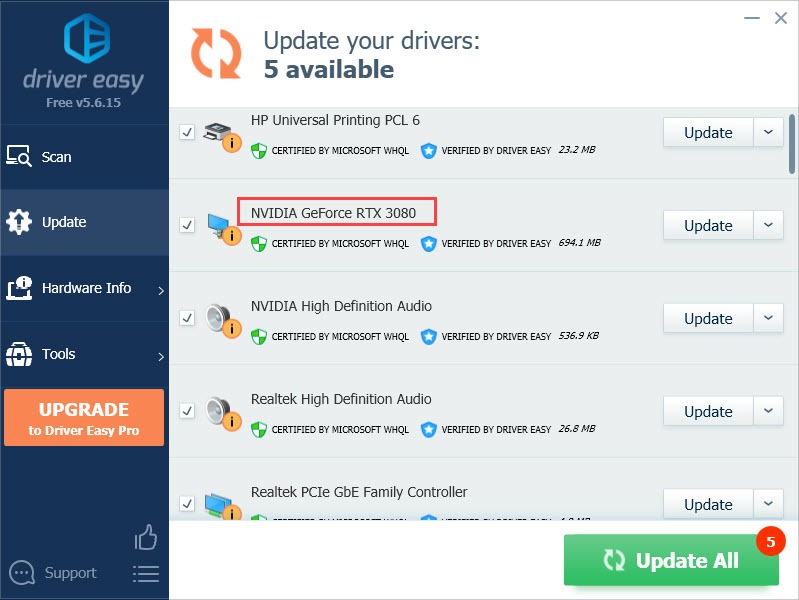
Or click Update All to automatically download and install the correct version of all the drivers that are missing or out of date on your system. (This requires the Pro version which comes withfull support and a30-day money back guarantee . You’ll be prompted to upgrade when you click Update All .)
- Once the driver is updated, reboot your PC for the changes to take effect.
Fix 7. Reboot your router/modem
The ‘Anticheat server connection lost ‘ can also be caused by network issues. First, you need to make sure you’ve selected the server with the lowest ping. If this doesn’t work, you’d better restart your router.
Just power off your router for some time and start it normally. Now you can log in again and try playing it again.
Fix 8. Use a VPN
If you have tried all these workarounds above and still you get the ‘Anticheat connection failed’ error in Escape from Tarkov, the best (temporary) solution is to use a VPN with a reasonable ping.
Using VPN, in general, is terrible for your ping, so it’s important to choose one that really works well with your game. Here we recommendNordVPN (check the 80% off coupon ), which also offers a 30-day free trial. You can use the VPN as a temporary fix and wait for the developers to work on a real fix.
Did one of the fixes above solve your issue? If so, feel free to drop us a line and share your experience with other players.
Also read:
- [New] FB Live Integration with Cable TV
- [Updated] Optimal Frame Quality at Low Movement Speeds
- [Updated] Ultimate Mix Seamless Free & Paid Blu-Ray Playback (Windows, macOS)
- 2024 Approved Soundscapes for Vimeo A Compreayer's Manual
- A Step-by-Step Guide to Fixing Fortnite's Error Code 84 and Connect with Friends
- Days Gone Multiplayer Free-to-Play Release: Official Launch Date Announced
- DayZ First-Person Shooter: Master Drop Rates Fast!
- Drive Engagement with FREE Tools Crafting Powerful FB Ad Videos for 2024
- Enhancing Visual Clarity and Response Time: Fixing Frame Rate Issues in Valorant - Comprehensive Tips
- In 2024, Mastering Android Device Manager The Ultimate Guide to Unlocking Your Samsung Galaxy M54 5G Device
- IPad Air Showdown: Is the Leap to iPad Air 5 a Must? Expert Review by ZDNet
- Mastering the Removal of DirectX Faults: A Hassle-Free Guide for FIFA 19 Players
- Overcoming the Hurdle of Initializing Resident Evil 5 on Personal Computers
- Resolving GeForce Experience Error: A Complete Guide on Troubleshooting and Fixing
- Title: Troubleshooting ‘Escape From Tarkov’s Server Disconnection Problems
- Author: Christopher
- Created at : 2024-10-30 03:16:07
- Updated at : 2024-10-31 20:30:41
- Link: https://win-blog.techidaily.com/troubleshooting-escape-from-tarkovs-server-disconnection-problems/
- License: This work is licensed under CC BY-NC-SA 4.0.

